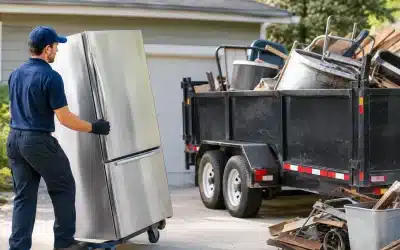
A remodel can look finished inside while the driveway, side yard, or job site tells a different story. Broken drywall, lumber offcuts, tile, old cabinets, and packaging pile up fast. This construction debris disposal guide helps homeowners, landlords, property managers, and contractors clear that pile without turning cleanup into another project.
The right disposal plan depends on what you have, how much there is, where the material is sitting, and how quickly the area needs to be usable again. A few bags from a bathroom update are different from a full kitchen tear-out or an ongoing renovation. Start with the material, then choose the hauling method that makes sense for your job.
Start by Separating Construction Debris
Sorting debris before it is loaded saves time, prevents safety issues, and makes it easier to send materials to the proper facility. You do not need a perfect recycling operation in the driveway. You do need to keep hazardous items and reusable materials out of the general pile.
Most construction cleanup falls into four groups:
- Heavy mineral debris: Concrete, brick, block, dirt, asphalt, and tile are dense and often have different disposal requirements than mixed junk.
- Wood and remodeling waste: Lumber, plywood, drywall, doors, cabinets, trim, carpet, insulation, and general demolition debris usually belong in a mixed construction-and-demolition load.
- Metal and fixtures: Appliances, piping, wire, metal studs, sinks, fixtures, and some tools may be recyclable or require separate handling.
- Special or hazardous materials: Paint, chemicals, solvents, batteries, fluorescent bulbs, pressurized containers, asbestos-containing materials, and lead-related debris should never be mixed into ordinary construction waste.
If you are not sure what a material is, do not guess. Set it aside and ask your hauling provider or local disposal facility before loading. That is especially true with older homes, where flooring, ceiling texture, insulation, and adhesives can require testing or specialized handling.
Plan Disposal Before Demolition Starts
Cleanup goes faster when debris has a designated place from day one. Before demolition begins, choose a staging area that is close enough for easy loading but does not block the garage, driveway access, sidewalks, or neighboring properties. Keep walkways open and stack materials so sharp edges, loose nails, and unstable piles are not creating a hazard.
For a small project, heavy-duty bags and a contained pile may be enough. For larger jobs, a dumpster, trailer, or full-service hauling crew may be more practical. The trade-off is simple: handling disposal yourself can cost less when the volume is small and you already have a suitable vehicle. It can become expensive and time-consuming once you factor in loading labor, dump fees, fuel, multiple trips, and the risk of damaging a truck with heavy material.
A full-service option is often the better fit when debris is spread across a property, located upstairs, mixed with bulky items, or needed gone the same day. You point out what needs to go, and the crew handles loading, hauling, and a final sweep of the area.
Estimate Volume and Weight Honestly
Construction debris takes up more space than most people expect. A stack of drywall may look manageable until it is broken down. Old cabinets have awkward, hollow volume. Concrete and dirt are the opposite problem: they may fit in a small area but become extremely heavy very quickly.
When requesting a quote, describe the project clearly. Mention whether materials are bagged or loose, whether there are stairs or narrow access points, and whether the debris includes heavy items such as tile, concrete, or soil. Photos can help show the actual volume and conditions. Accurate details lead to more accurate upfront pricing and fewer surprises on pickup day.
Know What Cannot Go in the Debris Pile
A construction debris pile is not a catch-all. Mixing restricted materials into a regular load can cause a facility to reject it or charge additional fees. It also puts workers and your property at risk.
Do not place wet paint, motor oil, gasoline, pesticides, solvents, propane tanks, batteries, or medical waste in general construction debris. Electronics, refrigerators, air conditioners, and certain appliances may also need separate handling because of components that require special processing.
Suspected asbestos deserves extra caution. Do not break it apart, sweep it up aggressively, or put it in a mixed load. If a property was built decades ago and the material is questionable, pause work and seek qualified guidance. The same cautious approach applies to potential lead-based paint debris during older-home renovations.
Keep the Job Site Safe While You Clean
Disposal is not only about where waste ends up. It is also about preventing injuries while it is still on site. Wear gloves, closed-toe work boots, and eye protection when moving debris. Long sleeves are useful around insulation, splintered lumber, and sharp metal.
Pull or flatten exposed nails when possible. Keep broken glass, blades, and sharp tile pieces in a rigid container rather than loose bags that can tear. Do not overload bags or boxes just because there is room left inside. A manageable load is safer for everyone carrying it and less likely to split across the driveway.
Watch where debris is staged after rain. Drywall, cardboard, and insulation can turn into a heavy, messy problem when wet. Wind can scatter plastic wrap, paper, and insulation across the property. Covering or promptly removing waste keeps the site cleaner and makes the final pickup faster.
Choose the Right Construction Debris Disposal Method
There is no single best option for every project. The right choice comes down to volume, timeline, labor, access, and material type.
Self-hauling works well when you have a small, sorted load, a capable vehicle, time for the trip, and confidence that the receiving facility accepts the materials. Call ahead if possible. Disposal rules, hours, load limits, and fees can vary, particularly for mixed debris and heavy materials.
A dumpster can work for a long project that produces waste over several days or weeks. It does require space for placement and may require approval if it will sit in a street or shared area. It also leaves all loading work to you or your crew.
Full-service junk removal is a strong choice when you want the debris gone without renting equipment, lifting heavy materials, or coordinating disposal trips. It is especially useful after a quick demo, a tenant turnover, an office build-out, or a last-minute cleanup before inspections or the next phase of work. For Covina-area jobs, I Am Junk, LLC can provide a straightforward, full-service option: the crew loads the debris, hauls it away, and leaves the space clear for what comes next.
Make Pickup Day Easy
Set aside items that are staying, especially tools, ladders, fixtures, and reusable materials. Clearly identify the debris to be removed so there is no confusion. If access is through a gate, garage, or building entrance, make sure it is unlocked and clear of parked vehicles when the crew arrives.
Let the haulers know about stairs, elevators, tight hallways, loose animals, or any materials that need special attention. Good communication protects your property and keeps the job moving. A dependable crew should confirm the scope and price before work begins, then load efficiently without leaving you to deal with the mess.
A clean job site makes the next step easier, whether that means installing new flooring, bringing in a new tenant, passing an inspection, or simply getting your driveway back. Sort what you can, keep hazardous material separate, and choose a disposal plan that respects both your schedule and your back.